
 The Microsoft.NET Framework contains a component called the
 ServiceController. It is designed to allow you to control a Windows Service. With this component you can easily start, stop, and pause services, and you can also retrieve information on the service such as its display name and status among others.
In this article I am going to show you how to use this ServiceController component and also how to enumerate the services running on your pc.
Enumerating Windows Services
To get a list of services running on a pc, we need to use the System.ServiceProcess.ServiceController class. The below code is using a static method called GetServices to return an array of ServiceController objects. Then the array is iterated and we are displaying the services’ information in a ListView component.
private void GetServices()
{
    try
    {
        lstServices.Items.Clear();

        ServiceController[] svcs = ServiceController.GetServices();

        foreach (ServiceController svc in svcs)
        {
            ListViewItem item = new ListViewItem();
            item.Text = svc.DisplayName;
            item.SubItems.Add(svc.ServiceName);
            item.SubItems.Add(svc.Status.ToString());

            lstServices.Items.Add(item);
        }
    }
    catch (Exception ex)
    {
        MessageBox.Show(ex.Message, ex.Source, MessageBoxButtons.OK, MessageBoxIcon.Error);
    }
}
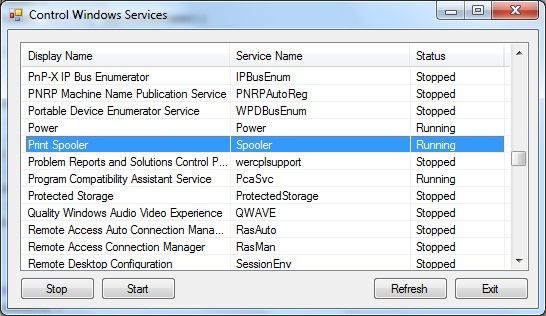
The below screenshot shows our ListView populated with the Windows services.
Controlling Windows Services
Now that we have a list of all the services running on our pc, we can use the ServiceController component to control any one of them.
To assign one of the selected services in the ListView to the ServiceController we must set the ServiceName property as shown below:
private void lstServices_SelectedIndexChanged(object sender, EventArgs e)
{
    if (lstServices.SelectedItems.Count > 0)
        this.serviceController.ServiceName = lstServices.SelectedItems[0].SubItems[1].Text.Trim();
}
Next we are using the Stop and Start methods of the ServiceController component to control the selected service. The code for this can be seen below:
private void btnStop_Click(object sender, EventArgs e)
{
    if (this.serviceController.CanStop)
    {
        this.serviceController.Stop();
        this.GetServices();
    }
}

private void btnStart_Click(object sender, EventArgs e)
{
    this.serviceController.Start();
    this.GetServices();
}
After we stop or start the selected service we are calling our GetServices method to re-populate the ListView so that we can see the updated statuses of our services.
The app.manifest File
Since we are accessing parts of the Windows operating system which require administrative privelages, we must add an app.manifest file to our project and set the requestedExecutionLevel to requireAdministrator if we are to run this code on Windows Vista or later.
<requestedExecutionLevel level="requireAdministrator" uiAccess="false" />
I have already covered how to create and use an app.manifest file in a previous article, so if you want further information you can check it out here: Writing To The Windows Event Log Using C#
Those are the basics that you need to know to control a Windows Service.
I hope you found this article useful. Stay tuned for more soon.
Dave
Very useful Dave.
Am new to C# so I appreciate you posting this.
Thanks.