 In this post I am going to show you a few different ways how you can format an integer (
int).
Padding with Zeroes
To pad your integer with zeroes write your format string with a colon (‘:’) and include as many zeroes as you wish after the colon ({0:[your zeroes]}). Below are a few examples.
string.Format("{0:00000}", 123);        // "00123"
string.Format("{0:00000}", -123);       // "-00123"

string.Format("{0:00000}", 5);          // "00005"
string.Format("{0:00000}", -5);         // "-00005"

string.Format("{0:00000}", 12345);      // "12345"
string.Format("{0:00000}", -12345);     // "-12345"

string.Format("{0:00000}", 12345678);   // "12345678"
string.Format("{0:00000}", -12345678);  // "-12345678"
Custom Formats
You can create your own custom formats as shown below. The ‘#’ character represents a number placeholder.
string.Format("{0:###-###-###-###}", 125658986325);  // "125-658-986-325"
string.Format("{0:+### ## ### ###}", 35621123456);   // "+356 21 123 456"
[continue reading…]
 In this post I have listed the different formatting options provided by .NET for a
 DateTime object.
The examples shown below are based on the following DateTime object:
// 18 September 2009 20:10:35
DateTime dt = new DateTime(2009, 09, 18, 20, 10, 35, 123);
|
Format specifier
|
Description
|
Result
|
dt.ToString();
|
To String
|
18/09/2009 20:10:35
|
dt.ToString("d");
dt.ToShortDateString();
|
Short date pattern.
|
18/09/2009
|
dt.ToString("D");
dt.ToLongDateString();
|
Long date pattern.
|
18 September 2009
|
dt.ToString("f");
|
Full date/time pattern (short time).
|
18 September 2009 20:10
|
dt.ToString("F");
|
Full date/time pattern (long time).
|
18 September 2009 20:10:35
|
dt.ToString("g");
|
General date/time pattern (short time).
|
18/09/2009 20:10
|
dt.ToString("G");
|
General date/time pattern (long time).
|
18/09/2009 20:10:35
|
dt.ToString("m");
dt.ToString("M");
|
Month/day pattern.
|
18 September
|
dt.ToString("o");
dt.ToString("O");
|
Round-trip date/time pattern.
|
2009-09-18T20:10:35.1230000
|
dt.ToString("r");
dt.ToString("R");
|
RFC1123 pattern.
|
Fri, 18 Sep 2009 20:10:35 GMT
|
dt.ToString("s");
|
Sortable date/time pattern.
|
2009-09-18T20:10:35
|
dt.ToString("t");
dt.ToShortTimeString();
|
Short time pattern.
|
20:10
|
dt.ToString("T");
dt.ToLongTimeString();
|
Long time pattern.
|
20:10:35
|
dt.ToString("u");
|
Universal sortable date/time pattern.
|
2009-09-18 20:10:35Z
|
dt.ToString("U");
|
Universal full date/time pattern.
|
18 September 2009 18:10:35
|
dt.ToString("y");
dt.ToString("Y");
|
Year month pattern.
|
September 2009
|
dt.ToBinary();
|
64-bit binary representation
|
633889014351230000
|
dt.ToFileTime();
|
Windows file time
|
128977710351230000
|
dt.ToFileTimeUtc();
|
Windows UTC file time
|
128977782351230000
|
dt.ToLocalTime();
|
Local time representation
|
18/09/2009 22:10:35
|
dt.ToOADate();
|
Equivalent OLE Automation date
|
40074.840684294
|
dt.ToUniversalTime();
|
Coordinated Universal Time (UTC)
|
18/09/2009 18:10:35
|
All the above examples which are using a format specifier character in the ToString() method can also be written using the string.Format() method. For example:
dt.ToString("U");
can be written as
string.Format("{0:U}", dt);
Although .NET supports a large number of predefined formats as shown above, it also allows you to create your own custom formats as we will see next.
[continue reading…]
 When writing software for the commercial world it is crucial your application can log errors, be it to the database, or to a text file, or even to the Windows Event Log if necessary. The .NET Framework contains a mechanism called a Trace Listener. This Listener is an object which directs the trace output to an appropriate target, such as an error log for example.
In this article I am going to show you how to use the Trace Listener to record your application’s errors to an error log.
To begin this example create a console application and add an App.config file to your project. We are going to use the App.config file to tell our application that it should create a trace listener on start-up. Amend the XML code of your App.config file to look like the below example.
<?xml version="1.0" encoding="utf-8" ?>
<configuration>
  <system.diagnostics>
    <trace autoflush="true" indentsize="4">
      <listeners>
        <add name="myListener" type="System.Diagnostics.TextWriterTraceListener" initializeData="application.log" />
        <remove name="Default" />
      </listeners>
    </trace>
  </system.diagnostics>
</configuration>
As you can see, we are adding a listener of type System.Diagnostics.TextWriterTraceListener which is set to write to a log file called application.log. Also note that in the <trace> node we are setting the autoflush attribute to true. When set to true this attribute tells the listener to flush the buffer after every write operation. For this example it is great but for real world applications you probably would want to set this to false to limit disk read and write operations.
[continue reading…]
When creating a custom dialog window, like for example a custom message box or a custom input box, you will most probably need to know which dialog button was clicked by the end user. This is very easy to accomplish in C# – all you have to do is set the DialogResult property of the Button controls on your custom dialog form.
Let’s create a very quick example.
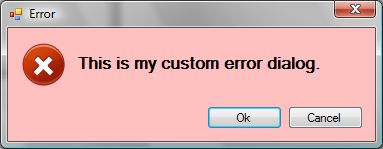
First create your custom dialog form and add an OK button and a Cancel button to it. You can customize your dialog however you like. For this example I created a simple custom error message box which is shown below:
Now to make your dialog behave like one we need to assign the DialogResult property of the Ok and Cancel buttons. You can either set these properties from the Properties Window in Visual Studio, or you could set them through code as shown below:
btnOk.DialogResult = DialogResult.OK;
btnCancel.DialogResult = DialogResult.Cancel;
[continue reading…]
 A few days ago I wrote an article describing how to create a worker thread for your Windows Forms. Just recently a friend of mine brought to my attention that the .NET Framework contains a component called
 BackgroundWorker which helps you to do what I had explained in that article but in an easier and quicker way. So I decided to read up on the BackgroundWorker component and now I am going to show you how to use it.
The BackgroundWorker component can be added to your form from the toolbox within Visual Studio. Once you add the component create an event handler for each of its three events – DoWork, ProgressChanged, and RunWorkerCompleted. After doing this you should end up with the below code.
private void backgroundWorker_DoWork(object sender, DoWorkEventArgs e)
{
}

private void backgroundWorker_RunWorkerCompleted(object sender, RunWorkerCompletedEventArgs e)
{
}

private void backgroundWorker_ProgressChanged(object sender, ProgressChangedEventArgs e)
{
}
Now just as we did in the Create a Worker Thread for your Windows Form example, let’s add a textbox which displays the progress of a heavy operation, and two buttons, one to start the operation and one to stop it.
Next we’re going to add the code of our heavy operation in the DoWork event handler of our BackgroundWorker.
private void backgroundWorker_DoWork(object sender, DoWorkEventArgs e)
{
    // Example heavy operation
    for (int i = 0; i <= 999999; i++)
    {
        // Sleep for 10ms to simulate work
        System.Threading.Thread.Sleep(10);

        // Report the progress now
        this.backgroundWorker.ReportProgress(i);

        // Cancel process if it was flagged to be stopped.
        if (this.backgroundWorker.CancellationPending)
        {
            e.Cancel = true;
            return;
        }
    }
}
[continue reading…]
